Exploring the North West[edit]
The Village of Restoration[edit]
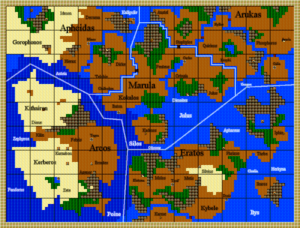
Now that you have a companion, death does not automatically mean Game Over. Should at least one of your companions survive a battle, you will need to know where to go in order to have a fallen character revived. That location is the Village of Restoration, which can be found tucked away in the mountains north west of Oruk. It is almost directly south of the village where Sage Kosama resides. Merely finding this village won't be enough; you will also need to bring along 30,000 guilders as payment for each character that you bring back to life.
The Kingdom of Apheidas[edit]
You will definitely wish to visit the king of the Apheidas region once Guy has joined your team. Like the Kingdom of Marula, this castle is not prominently located in a place that's easy to find. Once you journey west from Oruk and cross the first bridge, you will want to follow the river north, up and around the forest until you see the castle at the base of the mountains. If you step inside with 300 more fangs to prove your valor in battle, the king will reward Guy with the Turos Sword, which is rumored to dispel curses. This sword is necessary if you wish to travel any further south than the town of Kadia where you found Guy.


While you roam this region, you will begin to encounter new enemies. One such enemy is the Gurol. While it is capable of doing a bit of damage to poorly armored characters, it's attack is generally weak if you are well equipped. The prize for defeating such an enemy is 6000 guilders and 24 fangs. On the other hand, you may also find yourself up against a Black Monk. This encounter will not bode well for you at this point if you attempt to engage one in any way. They will not talk to you, and at this point in the game, they are very likely to defeat both you and Guy in battle. Despite the 200 reputation points they award, you should retreat right away.
The Town of Minos[edit]

After visiting the Kingdom of Apheidas, you can resume your journey west. You will cross another bridge and once again you should follow the river north. This will lead you straight to the town of Minos. Compared to the other towns you've visited, there is nothing remarkable about this one. Be sure to visit the Healer, and stock up on herbs if necessary. Your main reason for coming here is as a stop over for the next destination…
The Village of Hierax[edit]
This village is located almost directly west of the bridge that you last crossed to reach Minos. Here you will find a sword-smith, but not just any sword-smith. This smith is especially trained in the art of strengthening Legendary Weapons. He is the only smith in the world with the ability to upgrade your Legendary Weapons into their most powerful form. Naturally, such work will cost you. At a price of 60,000 per weapon, you will have to save up for this valuable service, but it is well worth the effort, and should be purchased as early as possible. Remember this location.
Note: If you are at a particularly high level, and have 11 Sacred Nuts at your disposal, you may wish to attempt to collect the Kronos Armor at this point to save yourself some time. Note that it is difficult to do without the aid of the Staff of Earthquakes, but it is possible if you are strong enough. To perform this step at this time, jump down to the Town of Menos section below, and then follow the rest of the walkthrough in order.
Heading South[edit]
The Village of Kadmos[edit]


As long as you have obtained the Turos Sword for Guy from the Kingdom of Apheidas, you are ready to extend your exploration to the south. Without a ship, you only have one option: the bridge which lies through the forest east of Kadia. (Be sure to save before you cross the bridge.) However, when you set foot on this bridge, you are immediately beset upon by a Skeleton. In addition to being rather difficult to retreat from, even if you manage to succeed, you will be instantly pulled back into a fight with it. Your only option is to defeat it, and this is only feasible with the Turos Sword which is capable of breaking through the protection enchantment on the Skeleton. Once you defeat it, you are free to continue your journey south, where you will find a village at the center of the island. In this village, a man will offer to sell you a boat, the Argo, for 30,000 guilders. If you have this much saved up, purchase the boat and prepare to set sail for Eratos.
When you arrive on the opposite shore, you will begin to encounter entirely new sets of monsters. Three are particularly worth noting:
The Town of Torif[edit]

Like Minos, Torif does not contain anything of particular interest beyond the Healer. Visit him to restore your health, and have a look around if you like before heading out. Also like Minos, Torif is merely a base to help you reach your next destination...
The Village of Karme[edit]
This remote southern village is south and a bit west of Torif. While you could travel west first to locate the bridge to Karme, you have a boat so crossing rivers is no longer a problem. Instead, follow the plain west from Torif and head south to the river. Cross over and you should spot the village. Inside is a man who can sell you the Staff of Earthquakes for 10,000 guilder apiece. You are only permitted to stock up on 4 of them at a time. If you have 40,000 guilder, you are advised to purchase four of them before the next step.
Waking Medi[edit]
The Town of Menos[edit]


Your next destination is actually all the way back to the north. North of the Town of Minos, you will find a small cluster of mountains to the east. Located in this cluster is a cave, and just east of the mountains is a town that is not indicated on the cloth map which is provided with the game. This unmarked town is the Town of Menos. Before visiting the cave, stop in Menos to heal up. When you are ready, leave town and save the game.

Before you proceed, you should ensure that you have 11 Sacred Nuts and 4 Staff of Earthquakes. While these items are not mandatory, they make the following fight substantially easier to win. When you access the cave, you will be attacked by the only resident, a Senpi. Senpis are the guardians of the Legendary Armor. They are quite strong and possess high levels of defense. Your first strategy should be to utilize all of your magic items before attacking with any one character. Doing so will not only whittle the Senpi's health as low as possible, it will prevent it from doing any damage to you. When you are out of items, attack with the healthiest character you have at each turn until the Senpi is defeated. Upon defeating the Senpi, your reputation will actually go down, since these legendary beasts are revered by the population. Nevertheless, you must defeat them in order to obtain necessary equipment; in this case, you will recover the Kronos Armor, the Legendary Armor for your main character. With the armor in your possession, return to Menos to heal your wounds before you trek back to the south.
The Town of Doris[edit]


After collecting the Kronos Armor, sail back to Eratos. When you arrive, visit Torif if necessary to heal your wounds, and stock up on four more Staves if you can afford to. Then make your way to the east coast of the main Eratos continent. Towards the south, you will find a town right on the coast, called Dorin. Dorin is much like any other town, except that one house appears to have a dancer. When you visit this dancer, you are given the opportunity to cast a spell. Once again, you have little choice but to cast "AWAKE, GIANT" which will immediately awaken Medi, and restore her memory. (The spell will not work if you did not collect Kronos Armor yet.) Medi will remember who she is and join your team. She is aware that the third member was cursed by a Black Monk. As with Guy, it is wise to purchase armor and a shield for Medi once you recruit her, but you can refrain from buying a weapon for her.


